 The first PC we got at our home was a Pentium II. My dad got it, because I was going to university, and I would be able to do something “useful” with it. (Yup, I survived my entire high school career searching stuff in the library and the home encyclopedia. Even more, Google didn’t even exist before we got our computer, as the company was only founded in 1998 🙂 ). The machine was advertised as state of the art with a clock rate of a whooping 233 MHz! During the decade that followed, the evolution of the clock rates kept going at a steady pace, until it saturated at about 3-4 GHz(15 times faster than the 233 MHz) around 2005. Since then, the clock rate has not increased a bit. If anything, the average clock rate has even decreased to the range 2-3 GHz. As power-consumption grows quadratically with with the clock rate, this means that (1) there is much more heat produced, that needs to be transported away from your CPU (otherwise it get’s destroyed), (2) reducing the clock rate by a factor 2, allows you to power 4 CPU’s at half the clock rate, effectively doubling your calculation power. (There are even more tricks involved in modern CPU’s which crack up performance such that the clock rate isn’t a real measure for performance any longer, and sales people need to learn more new buzzword to sell your computer/laptop 👿 )
 Where in 2005 you bought a single CPU with a high clock rate, you now get a machine with multiple cores. Most machines you can get these days have a minimum of 2 cores, with quad-core machines becoming more and more common. But, there is always a but, even though you now have access to multiple times the processing power of 2005, this does not mean that your own code will be able to use it. Unfortunately there is no simple compiler switch which makes your code parallel (like the -m64 switch which makes your code 64-bit), you have to do this yourself (the free lunch is over). Two commonly used frameworks for this task are OpenMP and MPI. The former mainly focuses on shared memory configurations (laptops, desktops, single nodes in a cluster), while the latter focuses of large distributed memory setups (multi-node clusters) and is thus well-suited for creating codes that need to run on hundreds or even thousands of CPU’s. The two frameworks differ significantly in their complexity, fortunately for us, OpenMP is both the easier one, and the one most suited for a modern multi-core computer. The OpenMP framework consists of pragma’s (or directives) which can be added in an existing code as comment lines, and tell a compiler knowledgeable of OpenMP how to parallelize the code. (It is interesting to note that MPI and OpenMP are inteded for parallel programming in either C, C++ or fortran … a hint that what the important programming languages are.)
OpenMP in Fortran: Basics
A. Compiler-options and such
As most modern fortran compilers also are well aware of openMP (you can check which version of openMP is supported here), you generally will not need to install a new compiler to write parallel fortran code. You only need to add a single compiler flag: -fopenmp (gcc/gfortran), -openmp (intel compiler), or -mp (Portland Group). In Code::Blocks you will find this option under Settings > Compiler > Compiler Settings tab > Compiler Flags tab (If the option isn’t present try adding it to “other compiler options” and hope your compiler recognizes one of the flags).
Secondly, you need to link in the OpenMP library. In Code::Blocks go to Settings > Compiler > Linker Settings tab > Link Libraries: add. Where you add the libgomp.dll.a library (generally found in the folder of your compiler…in case of 64 bit compilers, make sure you get the 64 bit version)
Finally, you may want to get access to OpenMP functions inside your code. This can be achieved by a use statement: use omp_lib.
B. Machine properties
OpenMP contains several functions which allow you to query and set several environment variables (check out these cheat-sheets for OpenMP v3.0 and v4.0).
- omp_get_num_procs() : returns the number of processors your code sees (in hyper-threaded CPU’s this will be double of the actual number of processor cores).
- omp_get_num_threads() : returns the number of threads available in a specific section of the code.
- omp_set_num_threads(I): Sets the number of threads for the openMP parallel section to I
- omp_get_thread_num() : returns the index of the specific thread you are in [0..I[
[codesyntax lang=”fortran” lines=”fancy” container=”div” strict=”yes” title=”Simple OpenMP functions” blockstate=”expanded” highlight_lines=”10,13″]
subroutine OpenMPTest1()
        use omp_lib;

        write(*,*) "Running OpenMP Test 1: Environment variables"
        write(*,*) "Number of threads :",omp_get_num_threads()
        write(*,*) "Number of CPU's available:",omp_get_num_procs()
        call omp_set_num_threads(8) ! set the number of threads to 8
        write(*,*) "#Threads outside the parallel section:",omp_get_num_threads()
        !below we start a parallel section
        !$OMP PARALLEL
        write(*,*) "Number of threads in a parallel section :",omp_get_num_threads()
        write(*,*) "Currently in thread with ID = ",omp_get_thread_num()
        !$OMP END PARALLEL

end subroutine OpenMPTest1
[/codesyntax]
Notice in the example code above that outside the parallel section indicated with the directives $OMP PARALLEL and $OMP END PARALLEL, the program only sees a single thread, while inside the parallel section 8 threads will run (independent of the number of cores available).
C. Simple parallelization
The OpenMP frameworks consists of an set of directives which can be used to manage the parallelization of your code (cheat-sheets for OpenMP v3.0 and v4.0). I will not describe them in detail as there exists several very well written and full tutorials on the subject, we’ll just have a look at a quick and easy parallelization of a big for-loop. As said, OpenMP makes use of directives (or Pragma’s) which are placed as comments inside the code. As such they will not interfere with your code when it is compiled as a serial code (i.e. without the -fopenmp compiler flag). The directives are preceded by what is called a sentinel ( $OMP ). In the above example code, we already saw a first directive: PARALLEL. Only inside blocks delimited by this directive, can your code be parallel.
[codesyntax lang=”fortran” lines=”fancy” container=”div” title=”OpenMP second test” highlight_lines=”18,21,29,31″]
subroutine OMPTest2()
        use omp_lib;

        integer :: IDT, NT,nrx,nry,nrz
        doubleprecision, allocatable :: A(:,:,:)
        doubleprecision :: RD(1:1000)
        doubleprecision :: startT, TTime, stt

        call random_seed()
        call random_number(RD(1:1000))
        IDT=500 ! we will make a 500x500x500 matrix
        allocate(A(1:IDT,1:IDT,1:IDT))

        write(*,'(A)') "Number of preferred threads:"
        read(*,*) NT
        call omp_set_num_threads(NT)
        startT=omp_get_wtime()
        !$OMP PARALLEL PRIVATE(stt)
        stt=omp_get_wtime()

        !$OMP DO
        do nrz=1,IDT
           do nry=1,IDT
              do nrx=1,IDT
              A(nrx,nry,nrz)=RD(modulo(nrx+nry+nrz,1000)+1)
              end do
           end do
        end do
        !$OMP END DO
        write(*,*) "time=",(omp_get_wtime()-stt)/omp_get_wtick()," ticks for thread ",omp_get_thread_num()
        !$OMP END PARALLEL
        TTime=(omp_get_wtime()-startT)/omp_get_wtick()
        write(*,*)" CPU-resources:",Ttime," ticks."

        deallocate(A)
    end subroutine RunTest2
[/codesyntax]
The program above fills up a large 3D array with random values taken from a predetermined list. The user is asked to set the number of threads (lines 14-16), and the function omp_get_wtime() is used to obtain the number of seconds since epoch, while the function omp_get_wtick() gives the number of seconds between ticks. These functions can be used to get some timing data for each thread, but also for the entire program. For each thread, the starting time is stored in the variable stt. To protect this variable of being overwritten by each separate thread, this variable is declared as private to the thread (line 18: PRIVATE(stt) ). As a result, each thread will have it’s own private copy of the stt variable.
The DO directive on line 21, tells the compiler that the following loop needs to be parallelized. Putting the !$OMP DO pragma around the outer do-loop has the advantage that it minimizes the overhead produced by the parallelization (i.e. resources required to make local copies of variables, calculating the distribution of the workload over the different threads at the start of the loop, and combining the results at the end of the loop).
As you can see, parallelizing a loop is rather simple. It takes only 4 additional comment lines (!$OMP PARALLEL , !$OMP DO, !$OMP END DO and !$OMP END PARALLEL) and some time figuring out which variables should be private for each thread, i.e. which are the variables that get updated during each cycle of a loop. Loop counters you can even ignore as these are by default considered private. In addition, the number of threads is set on another line giving us 5 new lines of code in total. It is of course possible to go much further, but this is the basis of what you generally need.
Unfortunately, the presented example is not that computationally demanding, so it will be hard to see the full effect of the parallelization. Simply increasing the array size will not resolve this as you will quickly run out of memory. Only with more complex operations in the loop will you clearly see the parallelization. An example of a more complex piece of code is given below (it is part of the phonon-subroutine in HIVE):
[codesyntax lang=”fortran” lines=”fancy” container=”div” title=”Parallel example: Phonon spectra” highlight_lines=”4,5,6,7,11,12,13,15,42,43,44,45,47″]
	!setup work space for lapack
        N = this%DimDynMat
        LWORK = 2*N - 1
        call omp_set_num_threads(this%nthreads)
        chunk=(this%nkz)/(this%nthreads*5)
        chunk=max(chunk,1)
        !$OMP PARALLEL PRIVATE(WORK, RWORK, DM, W, RPart,IO)
        allocate(DM(N,N))
        allocate( WORK(2*LWORK), RWORK(3*N-2), W(N) )
        !the write statement only needs to be done by a single thread, and the other threads do not need to wait for it
        !$OMP SINGLE
        write(uni,'(A,I0,A)') " Loop over all ",this%nkpt," q-points."
        !$OMP END SINGLE NOWAIT
        !we have to loop over all q-points
        !$OMP DO SCHEDULE(DYNAMIC,chunk)
        do nrz=1,this%nkz
            do nry=1,this%nky
                do nrx=1,this%nkx
                    if (this%kpointListBZ1(nrx,nry,nrz)) then
                        !do nrk=1,this%nkpt
                        WORK = 0.0_R_double
                        RWORK = 0.0_R_double
                        DM(1:this%DimDynMat,1:this%DimDynMat)=this%dynmatFIpart(1:this%DimDynMat,1:this%DimDynMat) ! make a local copy
                        do nri=1,this%poscar%nrions
                            do nrj=1,this%poscar%nrions
                                Rpart=cmplx(0.0_R_double,0.0_R_double)
                                do ns=this%vilst(1,nri,nrj),this%vilst(2,nri,nrj)
                                    Rpart=Rpart + exp(i*(dot_product(this%rvlst(1:3,ns),this%kpointList(:,nrx,nry,nrz))))
                                end do
                                Rpart=Rpart/this%mult(nri,nrj)
                                DM(((nri-1)*3)+1:((nri-1)*3)+3,((nrj-1)*3)+1:((nrj-1)*3)+3) = &
                                    & DM(((nri-1)*3)+1:((nri-1)*3)+3,((nrj-1)*3)+1:((nrj-1)*3)+3)*Rpart
                            end do
                        end do
                        call MatrixHermitianize(DM,IOS=IO)
                        call ZHEEV( 'V', 'U', N, DM, N, W, WORK, LWORK, RWORK, IO )
                        this%FullPhonFreqList(:,nrx,nry,nrz)=sign(sqrt(abs(W)),W)*fac
                    end if
                end do
            end do
        end do
        !$OMP END DO
        !$OMP SINGLE
        write(uni,'(A)') " Freeing lapack workspace."
        !$OMP END SINGLE NOWAIT
        deallocate( WORK, RWORK,DM,W )
        !$OP END PARALLEL
[/codesyntax]
In the above code, a set of equations is solved using the LAPACK eigenvalue solver ZHEEV to obtain the energies of the phonon-modes in each point of the Brillouin zone. As the calculation of the eigenvalue spectrum for each point is independent of all other points, this is extremely well-suited for parallelization, so we can add !$OMP PARALLEL and !$OMP END PARALLEL on lines 7 and 47. Inside this parallel section there are several variables which are recycled for every grid point, so we will make them PRIVATE (cf. line 7, most of them are work-arrays for the ZHEEV subroutine).
Lines 12 and 44 both contain a write-statement. Without further action, each thread will perform this write action, and we’ll end up with multiple copies of the same line (Although this will not break your code it will look very sloppy to any user of the code). To circumvent this problem we make use of the !$OMP SINGLE directive. This directive makes sure only 1 thread (the first to arrive) will perform the write action. Unfortunately, the SINGLE block will create an implicit barrier at which all other threads will wait. To prevent this from happening, the NOWAIT clause is added at the end of the block. In this specific case, the NOWAIT clause will have only very limited impact due to the location of the write-statements. But this need not always to be the case.
On line 15 the !$OMP DO pragma indicates a loop will follow that should be parallelized. Again we choose for the outer loop, as to reduce the overhead due to the parallelization procedure. We also tell the compiler how the work should be distributed using the SCHEDULE(TYPE,CHUNK) clause. There are three types of scheduling:
- STATIC: which is best suited for homogeneous workloads. The loop is split in equal pieces (size given by the optional parameter CHUNK, else equal pieces with size=total size/#threads)
- DYNAMIC: which is better suited if the workload is not homogeneous.(in this case the central if-clause on line 19 complicates things). CHUNK can again be used to define the sizes of the workload blocks.
- GUIDED: which is a bit like dynamic but with decreasing block-sizes.
From this real life example, it is again clear that OpenMP parallelization in fortran can be very simple.
D. Speedup?
On my loyal sidekick (with hyper-threaded quad-core core i7) I was able to get following speedups for the phonon-code (the run was limited to performing only a phonon-DOS calculation):
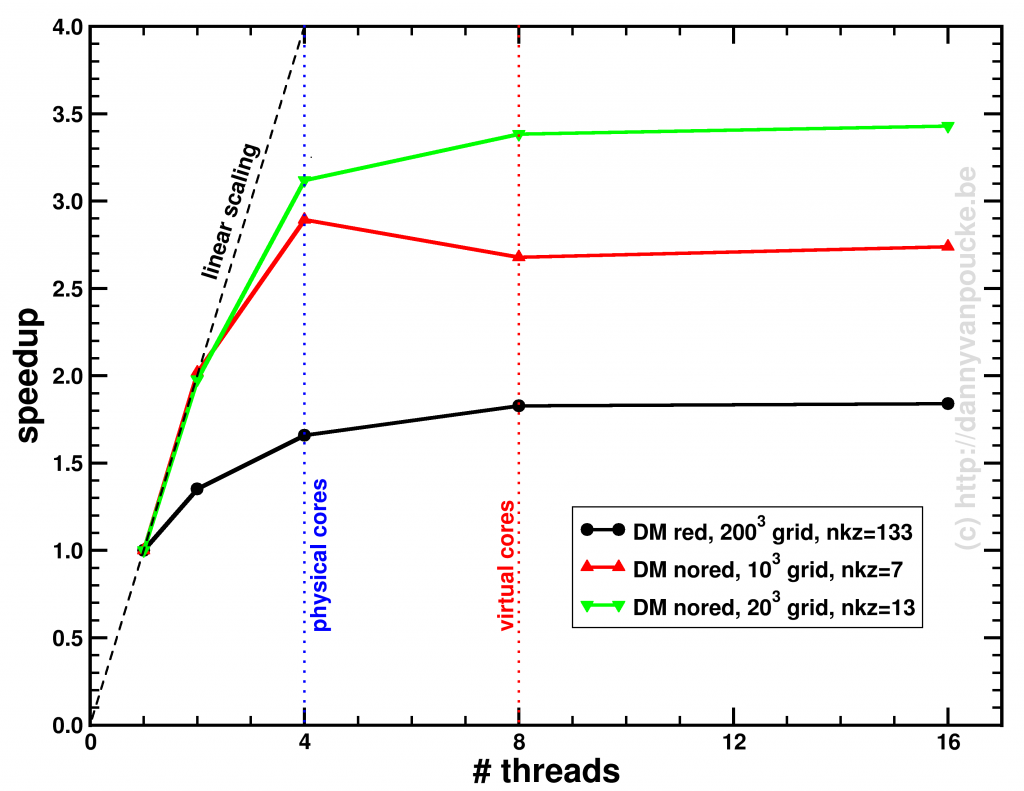
Speedup of the entire phonon-subroutine due to parallelization of the main-phonon-DOS loop.
The above graph shows the speed-up results for the two different modes for calculating the phonon-DOS. The reduced mode (DM red), uses a spectrum reduced to that of a unit-cell, but needs a much denser sampling of the Brillouin zone (second approach), and is shown by the black line. The serial calculation in this specific case only took 96 seconds, and the maximum speedup obtained was about x1.84. The red and green curves give the speedup of the calculation mode which makes use of the super-cell spectrum (DM nored, i.e. much larger matrix to solve), and shows for increasing grid sizes a maximum speedup of x2.74 (serial time: 45 seconds) and x3.43 (serial time 395 seconds) respectively. The reason none of the setups reaches a speedup of 4 (or more) is twofold:
- Amdahl’s law puts an upper limit to the global speedup of a calculation by taking into account that only part of the code is parallelized (e.g. write sections to a single file can not be parallelized.)
- There needs to be sufficient blocks of work for all threads (indicated by nkz in the plot)
In case of the DM nored calculations, the parallelized loop clearly takes the biggest part of the calculation-time, while for the DM red calculation, also the section generating the q-point grid takes a large fraction of the calculation time limiting the effect of parallelization. An improvement here would be to also parallelize the subroutine generating the grid, but that will be for future work. For now, the expensive DM nored calculations show an acceptable speedup.


 Last few months, I finally was able to remove something which had been lingering on my to-do list for a very long time: studying debugging in Fortran. Although I have been programming in Fortran for over a decade, and getting quite good at it, especially in the more exotic aspects such as OO-programming, I never got around to learning how to use decent debugging tools. The fact that I am using Fortran was the main contributing factor. Unlike other languages, everything you want to do in Fortran beyond number-crunching in procedural code has very little documentation (e.g., easy dll’s for objects), is not natively supported (e.g., find a good IDE for fortran, which also supports modern aspects like OO, there are only very few who attempt), or you are just the first to try it (e.g., fortran programs for android :o, definitely on my to-do list). In a long bygone past I did some debugging in Delphi (for my STM program) as the debugger was nicely integrated in the IDE. However, for Fortran I started programming without an IDE and as such did my initial debugging with well placed write statements. And I am a bit ashamed to say, I’m still doing it this way, because it can be rather efficient for a large code spread over dozens of files with hundreds of procedures.