

Current day computers generally have 64-bit processors, and most even have 64-bit operating systems. On such systems, 32-bit programs will run fine, but 64-bit programs can make more efficient use of the underlying system. When we installed a fortran compiler and the code::blocks IDE, the default fortran compiler generated 32-bit programs. This generally is not an issue, unless you need a large amount of memory, for example to store a temporary array with 4003 double precision coordinates (as I did for a project I’m currently working on). You may first start to look for ways of increasing the stack-size of your program, but you will soon discover that the problem is more profound: a 32-bit program cannot access address spacing beyond 4Gb. (In practice, generally you will not even reach 4Gb before running into problems.) This is because the memory address of your data is stored as a 32-bit value (232 = 4 294 967 296 = 4Gb) so the only way out of this predicament is a “larger address” aka 64-bit. So you need to install a new compiler capable of providing 64-bit programs.
Legend: Menu-paths / Important / Errors
A. Installing MingW64 for code::blocks
i. Installing the compiler
A common suggestion for installing a 64bit version of gfortran is the use of the TDM-GCC MingW compiler-installer. It is true that the installation runs very smoothly (and I would suggest it for this reason alone). Unfortunately the most recent gcc version available (at the time of writing this blogpost) was gcc-5.1.0 which gives rather nasty segmentation faults when trying to compile and test Lapack under windows. Luckily, this problem is resolved for gcc-5.3.0, so we will be getting this one instead. (Once TDM catches up to gcc-5.3 I suggest getting that one instead.)
- Go to the Gfortran compiler website: https://gcc.gnu.org/wiki/GFortran
- Under Quick Links follow the link Binaries for windows
- Under Windows follow the link snapshots under MinGW64 for Win64
- And then I followed the path Toolchains targetting Win64 > Personal Builds > mingw-builds > 5.3.0 > threads-posix > seh. Of course you could follow any of the other paths as well. My choice was mainly based on the large number of downloads of this version.
- Just unzip the folders in the location of your choice, et voilà, the compiler has been installed.
ii. Setting the PATH-variable (Win10)
Now you need to make sure your operating system can also find the installed compiler and tool-chain. As such you will need to add the location of the new compiler to the PATH environment variable. In Windows 10 open the control panel (do a search for “control panel”, it is easier than finding out the place it is hidden), follow System and Security > System > Advanced System Settings in the tab advanced click Environment Variables, and now you can modify the PATH variable by adding the location of the minGW bin folder (the one in which you find x86_64-w64-mingw32-gfortran.exe).
iii. Adding the compiler to Code::Blocks
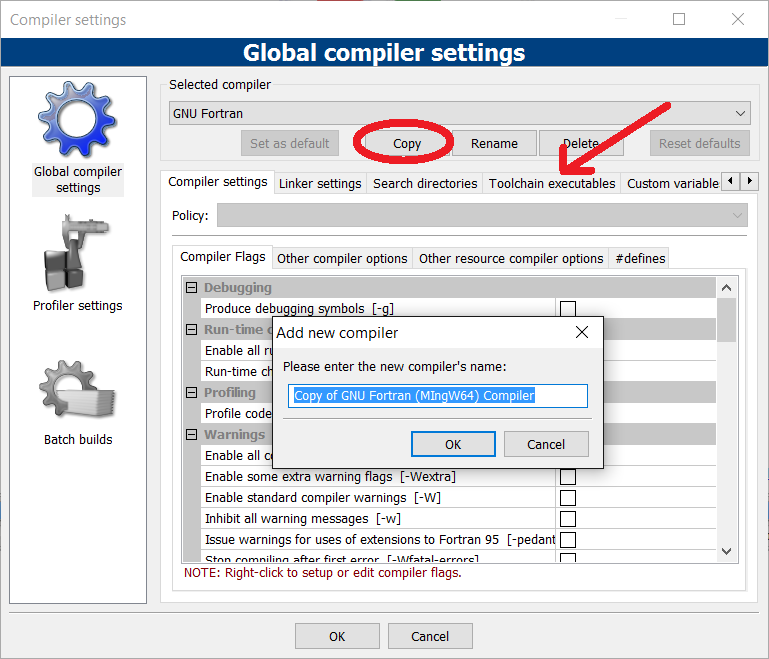
In this third and final step, we need to setup the compiler in code::blocks. For this you follow Settings > Compiler. Select the compiler you usually use for your 32-bit fortran programs and press copy. Give the new compiler a suitable name. By performing this copy, you have also copied all your preferred compiler and linker settings, making it easier to setup the new compiler.
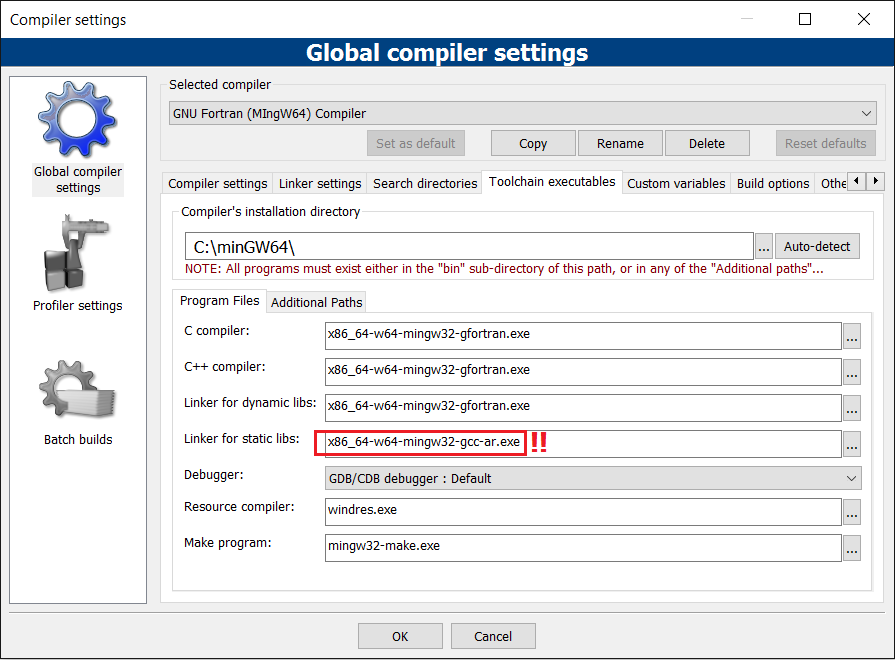
Now select Toolchain Executables, enter the path to the minGW64 installation and set the compilers and linker to x86_64-w64-mingw32-gfortran.exe. (Don’t use gfortran.exe as this might lead to confusion, both for yourself and the IDE.) In addition, set the ar-tool to x86_64-w64-mingw32-gcc-ar.exe, otherwise the compiler will not be able to link libraries made with this 64-bit compiler. Furthermore, under the tab compiler settings in the tab Other compiler options add the -m64 flag.
Finally, you may also want to update possible libraries in the linker settings tab (think for example of libgomp.dll.a if you use openmp for parallelisation).
At this point you can compile and run your fortran code using this compiler. The resulting 64-bit programs will now be able to access more than 2-4Gb of memory, and might turn out to run faster if you use much double precision arithmetic.
B. Upgrading Lapack to 64-bit
Installing Lapack on a Windows OS is a bit of a pickle, as this OS is generally not used for scientific computational work. As a result, the standard fortran compilation procedure is aimed at unix-based systems (i.e. makefiles to be run from the commandline). Luckily there exists a simple procedure for installing Lapack on a windows machine, which can be found here. [local copy of the procedure (50KB)][local copy of Lapack 3.4.0 source (6MB)]
The procedure consists of a pair of batch files streamlining the installation. The only thing you will have to do is tweak the make.inc file included with the procedure (cf. highlighted lines).


###################################################################
#  LAPACK make include file.                                      #
#  LAPACK, Version 3.4.0                                          #
#  November 2011                                                  #
###################################################################
#
SHELL =
#
#  Modify the FORTRAN and OPTS definitions to refer to the
#  compiler and desired compiler options for your machine.  NOOPT
#  refers to the compiler options desired when NO OPTIMIZATION is
#  selected.  Define LOADER and LOADOPTS to refer to the loader and
#  desired load options for your machine.
#
FORTRAN  = x86_64-w64-mingw32-gfortran.exeOPTS     = -O2 -m64DRVOPTS  = $(OPTS)
NOOPT    = -O0 -m64LOADER   = x86_64-w64-mingw32-gfortran.exeLOADOPTS =
#
# Timer for the SECOND and DSECND routines
#
# Default : SECOND and DSECND will use a call to the EXTERNAL FUNCTION ETIME
#TIMER    = EXT_ETIME
# For RS6K : SECOND and DSECND will use a call to the EXTERNAL FUNCTION ETIME_
# TIMER    = EXT_ETIME_
# For gfortran compiler: SECOND and DSECND will use a call to the INTERNAL FUNCTION ETIME
TIMER    = INT_ETIME
# If your Fortran compiler does not provide etime (like Nag Fortran Compiler, etc...)
# SECOND and DSECND will use a call to the INTERNAL FUNCTION CPU_TIME
## TIMER    = INT_CPU_TIME
# If neither of this works...you can use the NONE value... In that case, SECOND and DSECND will always return 0
# TIMER     = NONE
#
#  The archiver and the flag(s) to use when building archive (library)
#  If you system has no ranlib, set RANLIB = echo.
#
ARCH     = x86_64-w64-mingw32-gcc-ar.exeARCHFLAGS= cr
RANLIB   = x86_64-w64-mingw32-gcc-ranlib.exe
#
#  Location of the extended-precision BLAS (XBLAS) Fortran library
#  used for building and testing extended-precision routines.  The
#  relevant routines will be compiled and XBLAS will be linked only if
#  USEXBLAS is defined.
#
# USEXBLAS    = Yes
XBLASLIB     =
# XBLASLIB    = -lxblas
#
#  The location of the libraries to which you will link.  (The
#  machine-specific, optimized BLAS library should be used whenever
#  possible.)
#
BLASLIB      = ../../librefblas.a
LAPACKLIB    = liblapack.a
TMGLIB       = libtmglib.a
Tweaks:
- -m64 : This compiler flag makes sure you get 64-bit code. Trying to link a 32-bit version of Lapack in your 64-bit code will give problems.
- x86_64-w64-mingw32-gfortran.exe : use the explicit name of the 64-bit compiler, not the generic “gfortran”. This will prevent the make-program of accidentally using the wrong version when multiple versions are installed. When they are all included in the windows PATH variable, the make-program will just use the first one it encounters. (Use gfortran -v in the Command Prompt to find out which version is your current default.) Not using the explicit name may result in the following error message: “ gfortran: error: CreateProcess: No such file or directory “ when running makelibs.bat.
- x86_64-w64-mingw32-gcc-ar.exe & x86_64-w64-mingw32-gcc-ranlib.exe : You also need to make sure that you are using the 64-bit versions of the ar-program and the ranlib-program which combine the compiled objects into an archive, i.e. dll-file. When you use the default “ar” and “ranlib” you may end up seeing the error message : ” could not read symbols: Archive has no index; run Ranlib to add one “, when trying to run the library-tests through testlibs.bat.
- Use gcc-5.3 : While running the testlibs.bat script, I also ran into segmentation faults during the tests of level-2 and level-3 BLAS. This ended up probably being due to the use of gcc-5.1. After upgrading to minGW64 of gcc-5.3 this problem was resolved.
With everything fixed, and all problems circumvented, I now have the means to perform my calculations using the temporary 4003 double precision coordinate grid on my sidekick.