Tag: scientific programming

Python Tutorial: Child Classes

In the previous tutorial of the wordle-mania-series, we had a quick overview of how to construct a basic class in Python. Here we take our class adventure a step further and implement a child class. As before, the full source of this project can be found in our GitHub repo.

1. Building a child class.

The construction of a child class is near identical to the construction of a non-child class. The only difference being we need to somehow indicate the class is derived from another class. During our previous tutorial, we created the WordleAssistant class, so let’s use it as a parent for the WordleAssistant2 child class.

from .WordleAssistant import WordleAssistant

class WordleAssistant2(WordleAssistant):
    pass

First, note that we need to import the WordleAssistant class, which is stored in a file WordleAssistant.py, contained in the same folder as the file containing our child class (hence the “.” in front of WordleAssistant). At this point, most python developers will hate me for using the same name for what is considered a module and a class, as you could put multiple classes in a single file. Then again, once you start writing object oriented code, it is good practice to put only one class in a single file, which makes it rather strange to use different names.

Second, we put parent class between the brackets of the child class. Through this simple action, and the magic of inheritance, we just created an entirely new class containing all functions and functionality of the parent class. The keyword pass is used to indicate no further methods and attributes will be added.

2. Child class individuality.

Of course, we want our child class to not be just a wrapper of the parent class. The choice to use a child class can be twofold:

    1.  Extension of an existing class. This can either be because you are not the developer of the parent class, or (in case you are the developer) because you don’t want to accidentally destroy a working piece of software (c.q. parent class) while trying out some new features, or …
    2. Modification/implementation of specific class behavior. The standard (trivial) examples involve drawing classes, which in one child class draw circles, while in another it draws squares.
    3. Both of the above.

In our case, we are going to ‘upgrade‘ our WordleAssistant class by considering the prevalence of every letter at the specific position in the 5-letter word. This in contrast to our original implementation which only considered the prevalence of a letter anywhere in the word. Adding new functionality with “new” methods and attributes, happens as for the parent class. You just define the new methods and attributes, which should have names that differ from the names for methods and attributes already used by the parent class.

However, sometimes, you may want or have to modify existing methods. You can either replace the entire functionality overwriting that of the parent method, or you may extend that functionality.

2.1. Extending methods.

When you still want to make use of the functionality of the method of the parent class you could just copy that code, and add your own code to extend it. This however makes your code hard to maintain, as each time the parent class code is modified, you would need to modify your child class as well. This increases the risk of breaking the code. Luckily, similar as programming languages like C++ and Object Pascal,  there is a useful trick which allows you to wrap the parent class code in your overwritten child class method. A location where this trick is most often used is the initialization method. Below you can see the __init__ function of the  WordleAssistant2 child class.

def __init__(self, size: int = 5, dictionary : str = None ):
    super().__init__(size, dictionary)
    self.FullLettPrevSite = self._letterDistSite(self.FullWorddict)
    self.CurLettPrevSite = copy.deepcopy(self.FullLettPrevSite)

The super() function indicates we are going to access the methods of the parent of the class we are working in at the moment. The super().__init__() method therefor refers to the __init__ method of the WordleAssistant class. This means the __init__ method of the WordleAssistant2 child class will first perform the __init__ method of the WordleAssistant class and then execute the following two statements which initialize our new attributes. Pretty simple, and very efficient.

2.2. Overwriting methods.

In some cases, you don’t want to retain anything of the parent method. By overwriting a method, your child class will now use a totally new code which does not retain any functionality of the parent method. Note that in the previous section we were also overwriting the __init__ method, but we retained some functionality via the call using super(). An example case of a full overwrite is found in the _calcScore method:

def _calcScore(self, WD: dict, LP: list):
    for key in WD:
        WD[key]['score'] = 0
        for i in range(self.WordleSize):
            WD[key]['score'] += self.CurLettPrevSite[i][WD[key]['letters'][i]]

Although this method can still make use of attributes (self.WordleSize) and methods of the parent class, the implementation is very different and unrelated to that of the parent class. This is especially true in case of the python scripting language. Where a programming language like C++ or Object Pascal will require you to return the same type of result (e.g. the parent class returns an integer, then the child class can not return a string, or even a float.), python does not care.  It places the burden of checking this downstream: i.e. with the user. As a developer, it is therefore good practice to be better than standard python and take away as much of this burden from the future users of your code (which could be your future self.)

Finally, a small word of caution with regard to name mangling. Methods with two leading underscores can not be overwritten in the child class in the sense that these methods are not accessible outside the parent class. This means also inside a child class these methods are out of scope. If we had a __calcScore method instead, creating an additional __calcScore in our child class would give rise to a lot of confusion (for python and yourself) and unexpected behavior.

3. Additional sources:

Permanent link to this article: https://dannyvanpoucke.be/python-tutorial-child-classes/

Python Tutorial: Classes

Python, as any other scripting language allows you to define variables and functions. These are very basic entities when it comes to programming. However, sometimes it is useful to keep variables and functions that are related to one-another close together. This is the main idea behind Object Oriented programming and is present in programming languages such as C++ and fortran, but also in scripting languages like java and python. In this tutorial, you can find a first brief introduction into this topic, focusing on the concept of a class. 

This tutorial is part of a series of tutorials and the code is available via GitHub. As a real life example, used throughout this series, we consider a class for solving a wordle-puzzle.

1. The Python class

A class is a complex variable type, which contains specific methods (or functions) and attributes (or properties). An instance of such a complex variable is called an object, and different objects can have different values for their attributes (and even methods).

To create a class in python the class keyword is used followed by the name you want to assign your class. In our case this is the WordleAssistant class.

class WordleAssistant():

Defining attributes

This WordleAssistant contains the attributes relevant to our puzzle solver. For example, if we want to make a generic solver, two useful attributes would be the wordle word length (WordleSize) and a dictionary of possible words (FullWordset). Unlike fortran or C++, attributes are not defined in the class definition, but can be dynamically created for a class-object. This a feature (or design flaw) gives rise to some dangerous practices such as the runtime (accidental) addition of attributes to an object. For good practices, one should refrain from this and create all attributes by initializing them during the initialization of the class instance. This is done using the __init__() method of the class:

class WordleAssistant():
    def __init__(self, size: int = 5, dictionary: str = None):
        self.WordleSize = size
        if dictionary is None:
            dictionary = "Mydict.txt"
        self.FullWordset = self.readDictionary(dictionary)

Here the WordleSize attribute is defined by setting it to the size parameter of the __init__ method, while the FullWordset attribute is defined by assigning it the result of the readDictionary method of the WordleAssistant class. As is common (and good) practice in OO langues we use the self variable to indicate the instance of the class, binding attributes and methods to the instance. You may also have noted python uses a dot-notation to indicate attributes/methods of a class, similar as C++ (while fortran uses the % symbol with the same effect).

!! NOTE: There also exist “class attributes” which are defined the way one would define instance attributes in fortran or C++. However, in python these attributes are shared by all instances of the class, as such changing them in one object will change them in all objects, creating a mess.

Defining methods

In the previous section, we already defined a first method, the initialization method. As a method is a function, it is constructed as any other function in python using the def keyword, with the body indented. The method itself is indented one level with respect to the class level. Similar as for a usual function, one can indicate the expected type and default value for each function parameter, and if a result is returned the type can be indicated as well, as can be seen in the example below for the readDictionary method.

class WordleAssistant():
    def __init__(self, size: int = 5, dictionary: str = None):
        ...

    def readDictionary(self, wordlist: str = None)->list:
        ...
        return wordlist 

Privacy

Although private attributes and methods don’t technically exist in Python, it is convention that attributes and methods prefixed with a single underscore are to be treated as non-public parts of the API. In addition, using two or more underscores gives rise to name mangling, which gives a practical behavior akin to making attributes and methods private. The __init__ method above is an example. We will come back to this when discussing inheritance and child classes.

2. The Python Object

Once the class is implemented, it can be used in a script by creating instances of the class. These instances are called Objects.

WA = WordleAssistant()

The above command creates an object WA which is of the class WordleAssistant. The object is initialized through a call to the __init__ method, which is performed by the assignment above. If defaults are provided for all parameters of the __init__ method, then no variables need to be passed to the WordleAssistant class call. Otherwise the creation of an instance could look like this:

wordleSize = 5
WA = WordleAssistant(size=wordleSize,dictionary='MyWords.txt')

Access to the attributes and methods of the WA object s gained using the dot-notation:

wordsize = WA.WordleSize 
wordlist = WA.FullWordset
Top10Guess = WA.getTop(top = 10)

Within the context of data-encapsulation one should never access attributes directly but use get and set methods instead.

3. Additional sources:

Permanent link to this article: https://dannyvanpoucke.be/python-tutorial-classes/

Wordle-mania: an opportunity for python programming and artificial intelligence.

Over that last few months the wordle game has become increasingly popular, with people sharing their daily feats on Twitter. Currently the game is hosted by the NY times which bought it the end of January 2022 from its creator.  The game is rather straightforward: you have 6 guesses to find a 5-letter English word. Every guess, the game tells you if a letter is (1) not in the word [grey], (2) in the word at a different position [yellow/orange], or (3) in the word at the exact same position [green].

Wordle 242 4/6
⬛⬛🟨⬛⬛
⬛🟨⬛⬛⬛
⬛⬛🟩🟨🟩
🟩🟩🟩🟩🟩
An example of the result (as it looks when shared on Twitter). My first guess was the word “PIANO”, which means the A is in the word but at a different position. My second word, “QUERY”, adds the U to the list of letters that are present. With my third guess, “STUCK”, the position of the U and the K are fixed and we now also know the letter C is involved. At this point, I was also stuck, so I got some help of my wordle-assistant program, which taught me there could only be 1 word matching all the information we had: “CAULK“.

This seamlessly brings me to the central topic of this post: writing a program to help win this game as efficiently as possible. Not terribly original, but it’s a means to an end, as this simple project allows us to explore some more advanced topics in programming in python as well as artificial intelligence.

During this exploration I’ll  be including and updating a set of tutorials as well as this post. The python side of the project will focus on efficiency and easy of use and distribution, while the AI side will focus on smart ways predicting the best possible next guess. For the latter, an important caveat is that this means that the program should also work if you’re the last player living on earth, or if you decide to play wordle in a different language or a different number of letters. This means that creating a distribution of the  tweeted results of other players and comparing this with the complete set of brute-forced distributions to guess the wordle of the day in a single guess, would not satisfy my definition of AI. It is an interesting Big-data kaggle competition though.

Python Tutorials

  • Classes in Python. This tutorial provides a simple introduction in the concept of classes in python.
  • Child Classes. Continuing on the previous we deal now with child classes and the intricacies of function overriding and accessibility.
  • Python Library on Github.
  • Jupyter Notebook examples.
  • Slow Python: Profiling python in Jupyter. We look into profiling a Jupyter notebook script, to find the bottlenecks.
  • Slow Python: speeding up copying.


Artificial Intelligence

  • Distributions of words and letters.
  • Information theory of wordle?


The WordleAssistant Library and notebooks.

All tutorial code and jupyter notebooks can be found in this github repository.

Permanent link to this article: https://dannyvanpoucke.be/wordle-mania-an-opportunity-for-python-programming-and-artificial-intelligence/

Creating online forms and catching spam-bots

Recently, I decided to add a custom registration form  to my website, as part of an effort to improve and streamline the “HIVE-STM tool experience” 😉 . Up until now, potential users had to directly send me an e-mail, telling me a bit more about themselves and their work. I would then e-mail them the program, and add their information to a user list for future reference (i.e., support and some statistics for my personal entertainment).

This has the drawback that any future user needs to wait until I find the time to reply. To improve on the user-friendliness, I thought it would be nice to automate this a bit. A first step in this process entails making the application a bit more uniform: using an online registration form.

The art of learning something new: Do it from scratch

What started out with the intention of being an almost trivial exercise in building a web-form, turned into a steep learning curve about web-development and cyber-security. I am aware there exists many tools which generate forms for websites or even provide you a platform which hosts the form (e.g., google-forms, which I used in the past), but I wanted to do implement it myself (…something to do with pride 😉 ). Having build websites using HTML and CSS in the past, and having some basic experience with Javascript, this looked like a fun afternoon project. The HTML for the form was easily created using the tutorials found on w3schools.com and an old second edition “Handboek HTML5 en CSS3“, I picked up a few years ago browsing a second hand bookshop. Trouble, however, started rearing its ugly head as soon as I wanted to integrate this form in this WordPress website. Just pasting this into a page or post doesn’t really work, as WordPress wants to “help” you, and prevent you from hurting yourself. This is a fantastic feature if you have no clue about HTML/CSS/… or don’t want to care about it. Unfortunately, if you want to do something slightly more  advanced you are in for a hell of a ride, as you find out the relevant bits get redacted or disabled.
Searching for specific solutions with regard to creating a custom form in WordPress I was astounded at how often the default suggestion is: “use plugin XXX” or “use tool YYY”. Are we loosing the ability to want to craft something ourselves? Yes of course, there are professional tools available which can be better than anything you yourself can build in a short amount of time…but should it discourage you of trying, and feeling the satisfaction of having created something? I digress.

In the end, I discovered a good quality tutorial (once you get past the reasons why not to do it) and I started a long uphill battle trying to bend WordPress to my will:

  1. Paste form-code in postWP countermove: remove relevant tags essentially killing the form.
  2. Solution: put the form in a dedicated template ⇒ WP countermove: hard to integrate in existing theme, will be removed upon update of the theme
  3. Solution: create a child-theme ⇒ WP countermove: interesting exercise is getting the CSS style-sheet to work together with that of the parent theme. (wp_enqueue_style, wp_enqueue_scripts, get_template_directory_uri() and get_stylesheet_directory_uri() saved the day.)
  4. Add PHP back-end to the form…and deal with the idiosyncrasies of this scripting language. Crashed the website a few time due to missing “;”… error messages would be nice, instead of the blank web-page.


Trying not to torture future users

At this point, the form accepted input, and collected it via the PHP $_POST global variable. En route to this point, I read quite a few warnings about Cross-Site Request Forgery (CSRF) and that one should protect against it. Luckily, the tutorial practically showed how to do this in WordPress using nonces…in contrast to WordPress theme handbook which gives in formation, but not easy to understand if you are new to the subject.

With a basic sense of security, I was aiming at making things user-friendly, i.e., if something goes wrong it would be nice if you do not need to again fill out the form entirely. Searching for ways to keep this information I came across a lot of options, none of which seemed to work (cookies, PHP variables, global variables, etc). The problem appeared to originate from the fact that the information was not persistent. Once the web page started reloading, everything got erased. It was only at this point that I learned about “transients” in WordPress, and using get_transient() and set_transient() resolved all the issues instantaneously. There is only one caveat at this point: If two potential users submit their registration at almost the same time one may end up seeing the registration information of the other. (However, at this time the program is far from famous enough to present any issues, so statistics will save us from this).

Only one thing remained to be done: put all relevant information into two e-mail messages, one to be sent to myself, and one to be sent to the potential user. For this, I made use of the PHP mail() function. It works quite nicely, and after playing around with it for a bit (and convincing myself a nice HTML formatted layout will not work for example in gmail) the setup was complete. That evening, I went to bed, happy with the accomplishment: I had created something.

Too popular for comfort

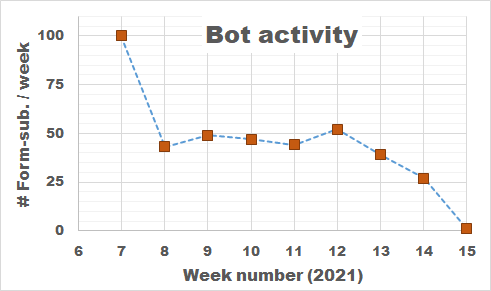
Bot Activity on the HIVE registration form during February and March of 2021.

Bot Activity on the HIVE registration form during February and March of 2021.

The next morning, I was amazed to find already several applications for the HIVE-STM program in my mailbox (that is, in addition to my own test runs). These were not sent by real humans, but appeared to be the work of bots just filling out the form and sending it off. This left me a bit puzzled, and I have been looking for the reason why anyone would actually bother writing a bot for this purpose. So far I’ve seen the suggestion that this is to improve the SEO of websites, generate spam-email (to yourself or with you as middleman), DOS-attacks, get access to your SQL database via code injection,…and after all my searches, I start to get the impression this may also be a means of promoting all the plugins, tools, frameworks that block these bots? In roughly each discussion you find, there will be at least one person promoting such a foolproof perfect tool 😯 🙄 …but might just be me.

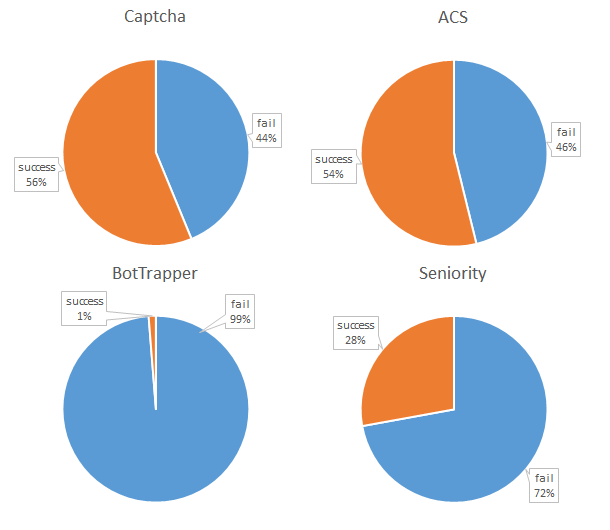
So how do we deal with these bots, preferably without driving potential users crazy? Reading all the suggestions (which unfortunately provide extremely little information on the actual working and logic of spam-bots themselves) I added, in several rounds, some tricks to block/catch the bots, and have been tracking the submits since the form went live. As you can see there is a steady stream of some 50 bots weekly trying to fill out the form. The higher number in the first week is due to any submission being redirected to the original form page, as such the same bots performed multiple attempts within the time-range of a few minutes. In about two months, I collected the results of 400 registration attempts by bots (and 4 by humans).

Analyzing the results, I learned learned some interesting things.

How to catch a bot? I track 4 different signals which may be indicative of bot behavior.

How to catch a bot? I track 4 different signals which may be indicative of bot behavior.

1. To Captcha or not to Captcha?

One of the first things to add, from a human perspective is “a captcha”. The captcha is manually implemented simple random sum/product/subtraction. It should be easy for humans, but it is annoying as they need to fill out an extra field (and may fill it out incorrectly). Interestingly, 56% of the bots fill out the Captcha correctly. Of course more complicated versions could be implemented or used…but the bottom line is simple: it generally does not do the job, and annoys the actual human being.

2. Bot Trapping for furs?

Going beyond captcha’s, a lot of tutorials suggest the use of a honeypot. One can either make use of automated options of existing frameworks, plugins or …implement these oneself. This option appears to be very successful in targeting bots. The 1% successful cases coincided with the only human submissions. At this point we appear to have a “fool-proof” method for distinguishing between humans and bots.

3. Dropping the bot down the box?

Interestingly, drop-down menu’s with not generally used topics seem to throw off bots as well. The seniority drop-down menu shows failure rates even better than the captcha.

Conclusion

Writing your own form from scratch is a very interesting exercise, and well worth the time if you want to learn more about web-security as well as the inner workings of the framework used for your website. Bots are an interesting nuisance, and captcha’s just bother your user as most bots can easily deal with them. Logging the inputs of the bots does show a wide range in quality of these bots. Some just fill out garbage, while others appear to be quite smart, filling out reasonable answers. Other bots clearly have malignant purposes, which becomes clear from the code they try to plug into the form fields.

For now, the registration form seems to be able to distinguish between human-and bot-users. As such, we have successfully completed another step in upgrading the STM-program

Permanent link to this article: https://dannyvanpoucke.be/creating-online-forms-and-catching-spam-bots/

A new life for the HIVE-STM program

“Once upon a time, there was a young researcher studying the formation of Pt nanowires on Ge substrates using quantum mechanical simulations. The results of the experimental counterparts were excellent; they provided Scanning Tunneling Microscopy images of ridiculously high quality …but not really atomistic structural information or detailed electronic band structures. On the other hand, the calculation-software of the young researcher provided only ground state energies and electronic band structures…but no Scanning Tunneling Microscopy images. So the young researcher set out to resolve this discrepancy.”

About 15 years ago, when starting out as a fresh Ph.D. student, I faced this mismatch between what my calculations could do and what my experimental counterparts had on offer. High quality ground state energies are nice, but rather useless in an experimental context governed by meta-stable states and high temperature transitions (especially since DFT represents only 0K results). I had to find a way to connect my calculations directly to the available experimental data, which boiled down to simulating Scanning Tunneling Microscopy (STM) images.

Original Delphi program: Graphene

Original Delphi program: Graphene

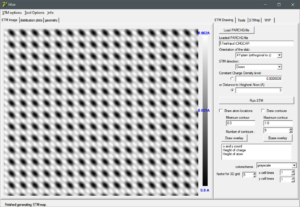
At that time, my programming skills were still nascent, but I felt king of the world knowing both pascal/Delphi and C/C++. I had written toy-programs in both languages, going from a text based battleships in turbo-pascal over a brick-buster game in C/C++using the djgpp compiler and allegro library to create the GUI, and many GUI programs in Delphi (e.g., the programs needed to numerically calculated Bose-Eistein condensation behavior for molecular condensates during my masters thesis). Based on those experiences, I knew that writing a GUI program  was much more straight forward in Delphi. So I set out writing my STM program using Delphi in the year(s) 2005-2006**. On the right you can see an screenshot of this program, generated today 15 years later, on the electron density of graphene. The program written in windows XP, ran smoothly and without modification or required recompile on both windows 7 and the current windows 10. Not to bad, if I say so myself. Try that with a python “program” 😈 .[1]

Free-standing Pt-induced nanowire on Ge(001).

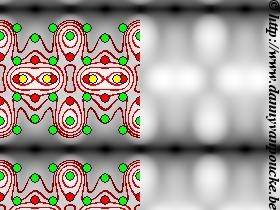
Simulated STM image of the Pt-induced nanowires on the Ge(001) surface. Green discs indicate the atomic positions of the bulk-Ge atoms; red: Pt atoms embedded in the top surface layers; yellow: Ge atoms forming the nanowire observed by STM.

The program was designed to work for my specific use-case at the time: a germanium 001 surface, with a nice rectangular surface unit cell (see figure on the left). This has the unfortunate consequence that systems with a non-rectangular unit cell appear skewed, as is seen for the graphene example above. However, as I never needed such systems myself, no fix was ever included.

After presenting STM results in my first published paper in 2008,[2] I got some questions if it was possible to share the program. I shared the program on an as-is basis: free to use, and I hope it works for you as well, but no support.

Reading the above you may wonder: “Why didn’t you put the source on GitHub, such that other people could collaborate with you on it, and extend it and fix bugs?” The answer is rather simple (and sobering at the same time): GitHub didn’t exist yet when I wrote the program, as it was founded only in February 2008. It grew rapidly since then (surpassing SourceForge in mid 2011), but as I was working on other projects there was no time to support such a setup.

The number of people asking for the program grew steadily, and there was the nagging feeling at the back of my head that I should really clean up the code and make it cross-platform. In 2011, I had a short period when I decided to start from scratch and write the program anew in Java. Unfortunately, my available time ran out, and initial tests showed the program had a hard time reading the large charge-density files fast. So the original Delphi version remained in use being distributed to new users. By September 2012, this program developed for my own purposes had been requested by 100 researchers (which is a lot considering the boundary conditions: (1) needing atomic scale STM simulations  and (2) using VASP for DFT calculations), and over 200 researchers had requested it by 2015. Currently, in January 2021, the counter indicates over 400 requests. Still the same piece of software, being used by people I never imagined would be interested on OS’s it was never designed for. Despite its simplicity, this unexpected interest makes me extremely proud. 😎 

Distribution of users over the continents and evolution of requests over the years.

Distribution of users over the continents and evolution of requests over the years.

Thorny roses: Some issues popping up

Given the original intent of the program and its eventual use, one should not be amazed that some issues popped up over the years. However, no serious bugs were encountered (which still amazes me).

  • Non-orthogonal surface units: This is the oldest known limitation of the program. It assumes a rectangular surface unit as it uses the direct grid used in the VASP CHGCAR file as a pixel grid. This suited my own purposes well, but is unfortunate for the user studying hexagonal surfaces.
  • “Smart” Antivirus software (1): In the early days, I just sent a zipfile with the program and manual to new users. Unfortunately, AVs do not like people mailing executables, leading to mails being blocked. For some time the problem could be circumvented by zipping the zipfile and later even renaming the extension of the second zip round to prevent the AV of trying to look inside. I know, one should not do this and applaud the AVs for protecting their users, as people did spread trojan horses and other viruses like this back in the days. (Who clicks on those strange attachments anyhow?) So we ended up storing the program and zip online with password protection. We are not yet safe of AVs as some still complain about the risks of downloading things of the internet…but at least we are not (yet) back at the automatic shredding of the program.
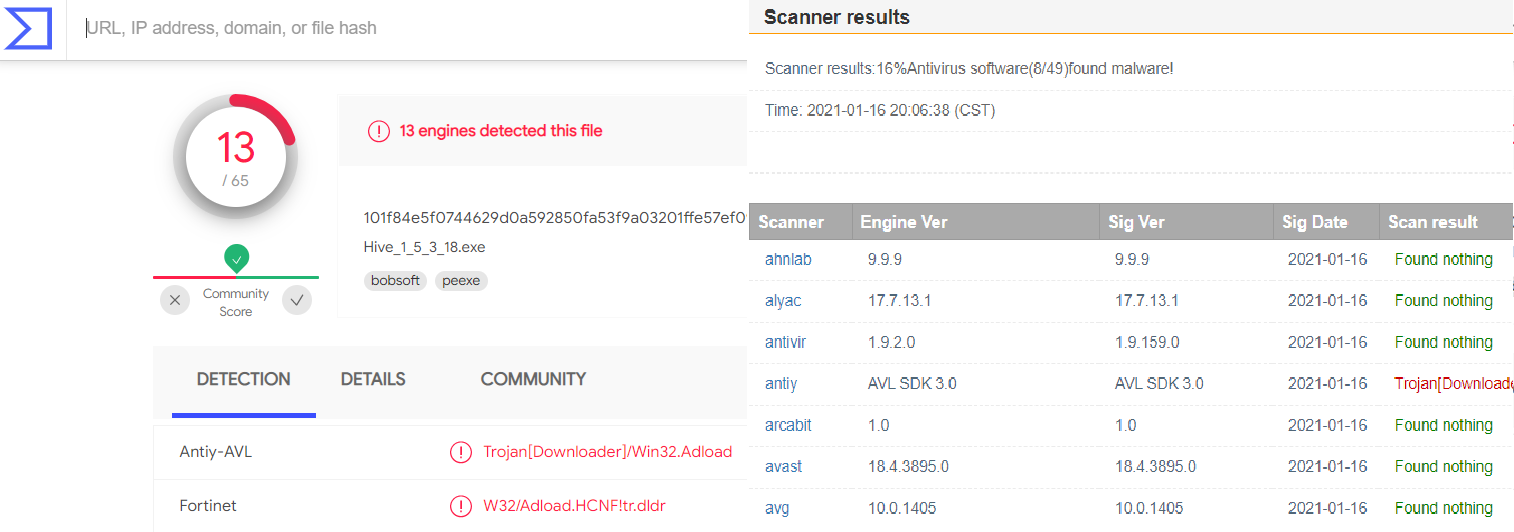
  • “Smart” Antivirus software (2):  Did I say the program was written in Delphi? Apparently so were a lot of computer viruses and worms. (Must be a sign of being a nice and easy to use language 🙂 ) With smart AVs training on pieces of code from such fraudulent software it becomes rather hard to write any code using Delphi which has not been part of a virus…and thus your program gets flagged. Some AVs are nice enough to tell the user, and even provide an option to keep the program. Others just shred it without even mentioning it (not cool). This is unfortunately becoming more of a problem. Online multi-virus-scanners give a rather bleak picture, as can be seen below.

    smart AVs giving false positives on the old HIVE executable.

    smart AVs giving false positives on the old HIVE executable.

  • Windows 10: Extending on the previous, windows 10’s anti-virus protection follows suit throwing up warnings and messages of possible security threats.
  • Mac and 64bit: Although the program was written for windows, it also runs smoothly in unix environments when using an emulator such as Wine, making the program available to Linux and Mac users as well. Unfortunately since the Mac OS version Catalina, Mac has dropped support for 32bit executables, making it no longer possible to run the 15 year old executable. [1] Remember that in 2006 64bit programs were new and not generally supported. Furthermore, 32bit executables tend to work smoothly on a 64bit system, they just “waste” half the memory.


The Future of HIVE-STM

Over the years, I’ve often considered it time to clean up the code, and upgrading it. Unfortunately time was always a major issue. In addition, I no longer had a working Delphi compiler so I was lured to the idea of rewriting it in a different programming language (I seriously considered reworking it in fortran, though the easy access to a GUI stopped me from doing this).

The latest issue with Macs and the zealous persecution of Delphi programs by AVs finally got me to the point of starting a full rework of the HIVE-STM program as a hobby project. The maturity of the Lazarus IDE and free-pascal compiler is an important second component. During the summer holidays of 2020, I started porting the original Delphi code to the Lazarus IDE and free-pascal. This successful port gave me the courage to continue working on it, and I am currently performing a full rewrite of the internals (so far things have gone smoothly). The new version will become available via GitHub once I am confident it is working well and a have setup a good method of keeping track of new users.

New years resolution 2021:
“Finally build a new ‘updated’ version of HIVE-STM “


References

[1]Challenge to scientists: does your ten-year-old code still run?“, J.M. Perkel, nature technology feature, august 24th 2020.
[2]Formation of Pt-induced Ge atomic nanowires on Pt/Ge(001)“, D.E.P. Vanpoucke & G. Brocks, Phys. Rev. B 77, 241308(R) 2008.

Permanent link to this article: https://dannyvanpoucke.be/new-hive-stm-1/

Parallel Python in classes…now you are in a pickle

In the past, I discussed how to create a python script which runs your calculations in parallel.  Using the multiprocessing library, you can circumvent the GIL and employing the async version of the multiprocessing functions, calculations are even performed in parallel. This works quite well, however, when using this within a python class you may run into some unexpected behaviour and errors due to the pickling performed by the multiprocessing library.

For example, if the doOneRun function is a class function defined as

class MyClass:
...
    def doOneRun(self, id:int):
       return id**3
...

and you perform some parallel calculation in another function of your class as

class MyClass:
...
    def ParallelF(self, NRuns:int):
       import multiprocessing as mp

       nproc=10
       pool=mp.Pool(processes=nprocs) 
       drones=[pool.apply_async(self.doOneRun, args=(nr,)) for nr in range(NRuns)] 

       for drone in drones: 
           Results.collectData(drone.get()) 
       pool.close() 
       pool.join() 
       
...

you may run into a runtime error complaining that a function totally unrelated to the parallel work (or even to the class itself) can not be pickled. 😯

So what is going on? In the above setup, you would expect the pool.apply_async function to take just a function pointer to the doOneRun function. However, as it is provided by a the call self.doOneRun, the pool-function grabs the entire class and everything it contains, and tries to pickle it to distribute it to all the processes.  In addition to the fact that such an approach is hugely inefficient, it has the side-effect that any part associated to your class needs to be pickleable, even if it is a class-function of a class used to generate an object which is just a property of the MyClass Class above.

So both for reasons of efficiency and to avoid such side-effects, it is best to make the doOneRun function independent of a class, and even placing it outside the class.

def doOneRun(id:int):
    return id**3
  
class MyClass:
...
    def ParallelF(self, NRuns:int):
       import multiprocessing as mp

       nproc=10
       pool=mp.Pool(processes=nprocs) 
       drones=[pool.apply_async(doOneRun, args=nr) for nr in range(NRuns)] 

       for drone in drones: 
           Results.collectData(drone.get()) 
       pool.close() 
       pool.join() 
       
...

This way you avoid pickling the entire class, reducing initialization times of the processes and the  unnecessary communication-overhead between processes. As a bonus, you also reduce the risk of unexpected crashes unrelated to the calculation performed.

Permanent link to this article: https://dannyvanpoucke.be/parallel-python-classes-pickle/

Tutorial OOP(V): Documenting Fortran 2003 Classes

In the previous sessions of this tutorial on Object Oriented Programming in Fortran 2003, the basics of OO programming, including the implementation of constructors and destructors as well as operator overloading were covered. The resulting classes have already become quite extended (cf. github source). Although at this point it is still very clear what each part does and why certain choices were made, memory fades. One year from now, when you revisit your work, this will no longer be the case. Alternately, when sharing code, you don’t want to have to dig through every line of code to figure out how to use it. These are just some of the reasons why code documentation is important. This is a universal habit of programming which should be adopted irrespective of the programming-language and-paradigm, or size of the code base (yes, even small functions should be documented).

In Fortran, comments can be included in a very simple fashion: everything following the “!” symbol (when not used in a string) is considered a comment, and thus ignored by the compiler. This allows for quick and easy documentation of your code, and can be sufficient for single functions. However, when dealing with larger projects retaining a global overview and keeping track of interdependencies becomes harder. This is where automatic documentation generation software comes into play.  These tools parse specifically formatted comments to construct API documentation and user-guides. Over the years, several useful tools have been developed for the Fortran language directly, or as a plugin/extension to a more general tool:

  • ROBODoc : A tool capable of generating documentation (many different formats) for any programming/script language which has comments.  The latest update dates from 2015.
  • Doctran : This tool is specifically aimed at free-format (≥ .f90 ) fortran, and notes explicitly the aim to deal with object oriented f2003. It only generates html documentation, and is currently proprietary with license costs of 30£ per plugin. Latest update 2016.
  • SphinxFortran : This extension to SphinxFortran generates automatic documentation for f90 source (no OO fortran) and generates an html manual. This package is written in python and requires you to construct your config file in python as well.
  • f90doc / f90tohtml : Two tools written in Perl, which transform f90 code into html webpages.
  • FotranDOC : This tool (written in Fortran itself) aims to generate documentation for f95 code, preferably in a single file, in latex. It has a simple GUI interface, and the source of the tool itself is an example of how the fortran code should be documented. How nice is that?
  • FORD : Ford is a documentation tool written in python, aimed at modern fortran (i.e. ≥ f90).
  • Doxygen :  A multi-platform automatic documentation tool developed for C++, but extended to many other languages including fortran. It is very flexible, and easy to use and can produce documentation in html, pdf, man-pages, rtf,… out of the box.

As you can see, there is a lot to choose from, all with their own quirks and features. One unfortunate aspect is the fact that most of these tools use different formatting conventions, so switching from one to the another is not an exercise to perform lightly. In this tutorial, the doxygen tool is used, as it provides a wide range of options, is multi-platform,  supports multiple languages and multiple output formats.

As you might already expect, Object Oriented Fortran (f2003) is a bit more complicated to document than  procedural Fortran, but with some ingenuity doxygen can be made to provide nice documentation even in this case.

1. Configuring Doxygen

Before you can start you will need to install doxygen:

  1. Go the the doxygen-download page and find the distribution which is right for you (Windows-users: there are binary installers, no hassle with compilations 🙂 ).
  2. Follow the installation instructions, also install GraphViz, this will allow you to create nicer graphics using the dot-tool.
  3. Also get a pdf version of the manual (doxygen has a huge number of options)

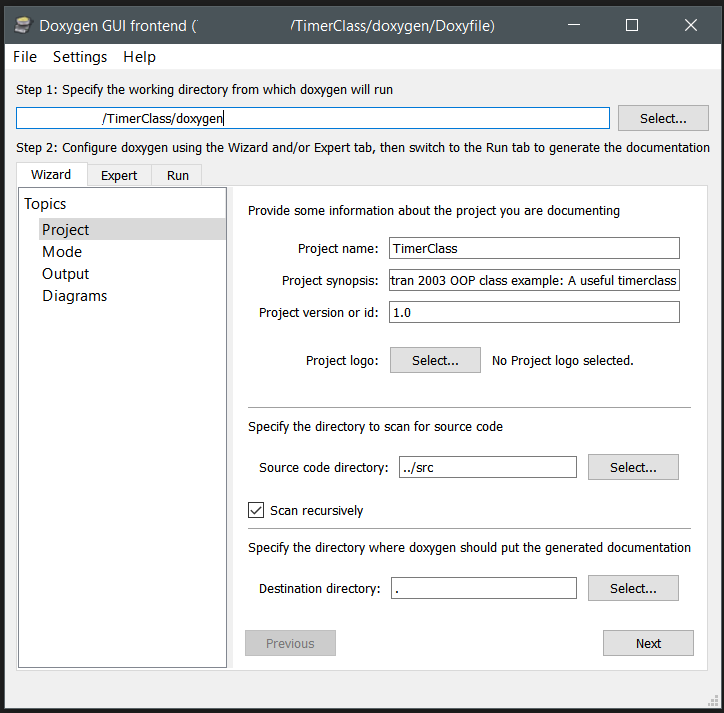
With a nicely installed doxygen, you can make use of the GUI to setup a configuration suited to your specific needs and generate the documentation for your code automatically. For Object Oriented Fortran there are some specific settings you should consider:GUI interface of doxygen.

  1.  Wizard tab

    • Project Topic : Fill out the different fields. In a multi-file project, with source stored in a folder structure, don’t forget to select the tick-box “Scan recursively” .
    • Mode Topic : Select “Optimize for Fortran output”.
    • Output Topic : Select one or more output formats you wish to generate: html, Latex (pdf), map-pages, RTF, and XML
    • Diagrams Topic: Select which types of diagrams you want to generate.
  2. Expert tab

    (Provides access each single configuration option to set in doxygen, so I will only highlight a few. Look through them to get a better idea of the capabilities of doxygen.)

    • Project Topic :
      • EXTENSION_MAPPING: You will have to tell doxygen which fortran extensions you are using by adding them, and identifying it as free format fortran: e.g. f03=FortranFree (If you are also including text-files to provide additional documentation, it is best to add them here as well as free format fortran).
    • Build Topic:
      • CASE_SENSE_NAMES: Even though Fortran itself is not case sensitive, it may be nice to keep the type of casing you use in your code in your documentation. Note, however, that even though the output may have upper-case names, the documentation itself will require lower-case names in references.
    • Messages Topic:
      • WARN_NO_PARAMDOC: Throw a warning if documentation is missing for a function variable. This is useful to make sure you have a complete documentation.
    • Source Browser Topic:
      • SOURCE_BROWSER: Complete source files are included in the documentation.
      • INLINE_SOURCES: Place the source body with each function directly in the documentation.
    • HTML Topic:
      • FORMULA_FONTSIZE: The fontsize used for generated formulas. If 10 pts is too small to get a nice effect of formulas embedded in text.
    • Dot Topic:
      • HAVE_DOT & DOT_PATH: If you installed GraphViz
      • DOT_GRAPH_MAX_NODES: Maximum number of nodes to draw in a relation graph. In case of larger projects, 50 may be too small.
      • CALL_GRAPH & CALLER_GRAPH: Types of relation graphs to include.
  3. Run tab

    • Press “Run doxygen” and watch how your documentation is being generated. For larger projects this may take some time. Fortunately, graphics are not generated anew if they are present from a previous run, speeding things up. (NOTE: If you want to generate new graphics (and equations with larger font size), make sure to delete the old versions first.) Any warnings and errors are also shown in the main window.
    • Once doxygen was run successfully, pressing the button “Show HTML output” will open a browser and take you to the HTML version of the documentation.


Once you have a working configuration for doxygen, you can save this for later use. Doxygen allows you to load an old configuration file and run immediately. The configuration file for the Timer-class project is included in the docs folder, together with the pdf-latex version of the generated documentation.  Doxygen generates all latex files required for generating the pdf. To generate the actual pdf, a make.bat file needs to be run (i.e. double-click the file, and watch it run) in a Windows environment.

2. Documenting Fortran (procedural)

Let us start with some basics for documenting Fortran code in a way suitable for doxygen. Since doxygen has a very extensive set of options and features, not all of them can be covered. However, the manual of more than 300 pages provides all the information you may need.

With doxygen, you are able to document more or less any part of your code: entire files, modules, functions or variables. In each case, a similar approach can be taken. Let’s consider the documentation of the TimeClass module:

  1. !++++++++++++++++++++++++++++++++++++++++++++++++++++++++++++++++++++++++
  2. !> \brief The <b>TimeClass module</b> contains the
  3. !! \link ttime TTime class\endlink used by the
  4. !! \link timerclass::ttimer TTimer class\endlink for practical timing.
  5. !!
  6. !! @author  Dr. Dr. Danny E. P. Vanpoucke
  7. !! @version 2.0-3  (upgrades deprecated timing module)
  8. !! @date    19-03-2020
  9. !! @copyright https://dannyvanpoucke.be
  10. !!
  11. !! @warning Internally, Julian Day Numbers are used to compare dates. As a
  12. !! result, *negative* dates are not accepted. If such dates are created
  13. !! (*e.g.*, due to a subtraction), then the date is set to zero.
  14. !!
  15. !! This module makes use of:
  16. !! - nothing; this module is fully independent
  17. !<-----------------------------------------------------------------------
  18. module TimeClass
  19.     implicit none
  20.     private

The documentation is placed in a standard single or multi-line fortran comment.  In case of multi-line documentation, I have the personal habit turning it into a kind of banner starting with a “!+++++++++” line and closing with a “!<——————-” line.  Such choices are your own, and are not necessary for doxygen documentation. For doxygen, a multi-line documentation block starts with “!>” and ends with “!<“ . The documentation lines in between can be indicated with “!!”. This is specifically for fortran documentation in doxygen. C/C++ and other languages will have slightly different conventions, related to their comment section conventions.

In the block above, you immediately see certain words are preceded by an “@”-symbol or a “\”, this indicates these are special keywords. Both the “@” and “\” can be used interchangeably for most keywords, the preference is again personal taste.  Furthermore, doxygen supports both html and markdown notation for formatting, providing a lot of flexibility. The multi-line documentation is placed before the object being documented (here an entire module).

Some keywords:

  • \brief : Here you can place a short description of the object. This description is shown in parts of the documentation that  provide an overview. Note that this is also the first part of the full documentation of the object itself. After a blank line, the \details(this keyword does not need to provided explicitly) section starts, providing further details on the object. This information is only visible in the documentation of the object itself.
  • \link … \endlink, or \ref : These are two option to build links between parts of your documentation. You can either use \ref nameobject or \link nameobject FormattedNameObject \endlink. Note that for fortran, doxygen uses an all non-capitalized namespace, so YourObject needs to be referenced as \ref yourobject or you will end up with an error and a missing link. So if you want your documentation to show YourObject as a link instead of yourobject, you can use the \link … \endlink construction.
  • “::”  : Referring to an element of an object can be done by linking the element and the object via two colons:  object::element . Here it is important to remember that your module is an object, so linking to an element of a module from outside that module requires you to refer to it in this way.
  • @author : Provide information on the author.
  • @version : Provide version information.
  • @date : Provide information on the date.
  • @copyright : Provide information on the copyright.
  • @warning : Provides a highlighted section with warning information for the user of your code (e.g., function kills the program when something goes wrong).
  • @todo[not shown] If you still have some things to do with regard to this object you can use this keyword. More interestingly, doxygen will also create a page where all to-do’s of the entire project are gathered, and link back to the specific code fragments.


  1. !++++++++++++++++++++++++++++++++++++++++++++++
  2. !>\brief Function to subtract two \link ttime TTime\endlink instance
  3. !! via the "-" operator. This is the function
  4. !! performing the actual operator overloading.
  5. !!
  6. !! \b usage:
  7. !! \code{.f03}
  8. !! Total = this - that
  9. !! \endcode
  10. !! This line also calls the \link copy assignment operator\endlink.
  11. !!
  12. !! \note The result should remain a positive number.
  13. !!
  14. !! @param[in] this The \link ttime TTime\endlink instance before
  15. !!                 the "-" operator.
  16. !! @param[in] that The \link ttime TTime\endlink instance after
  17. !!                 the "-" operator.
  18. !! \return Total The \link ttime TTime\endlink instance representing
  19. !!               the difference.
  20. !<---------------------------------------------
  21.     pure function subtract(this,that) Result(Total)
  22.         class(TTime), intent(in) :: this, that
  23.         Type(TTime) :: total

When documenting functions and subroutines there are some addition must-have keywords.

  • @param[in] , @param[out] ,or@param[in,out] : Provide a description for each of the function parameters, including their  intent: “in”, “out”, or “in,out” (note the comma!).
  • \return : Provides information on the return value of the function.
  • \b, \i : The next word is bold or italic
  • \n : Start a newline, without starting a new paragraph.
  • \note : Add a special note in your documentation. This section will be high lighted in a fashion similar to @warning.
  • \code{.f03}…\endcode :  This environment allows you to have syntax highlighted code in your documentation. The language can be indicated via the “extension” typical for said language. In this case: fortran-2003.
  • \f$ … \f$, or \f[ … \f] : Sometimes equations are just that much easier to convey your message. Doxygen also supports latex formatting for equations. These tags can be used to enter a latex $…$ or \[ \] math environments. The equations are transformed into small png images upon documentation generation, to be included in the html of your documentation. There are two important aspects to consider when using this option:
    1. Font size of the equation: Check if this is sufficient and don’t be afraid to change the font size to improve readability.
    2. Compilation is not halted upon an error: If the latex compiler encounters an error in your formula it just tries to continue. In case of failure, the end result may be missing or wrong. Debugging latex equations in doxygen documentation can be quite challenging as a result. So if you are using large complex equations, it may be advised to run them in a pure latex environment, and only past them in the documentation once you are satisfied with the result.


3. Documenting Fortran Classes

With the knowledge of the previous section, it is relatively easy to document most fortran code. Also the type of object orientation available in fortran 95, in which a fortran module is refurbished as a class. True fortran classes in contrast tend to give a few unexpected issues to deal with. Lets have a look at the documentation of the TTime class of the TimeClass module:

  1. !+++++++++++++++++++++++++++++++++++++++
  2. !> @class ttime
  3. !! \brief The TTime class contains all time functionality
  4. !! with regard to a single time stamp.
  5. !<-------------------------------------
  6.     type, public :: TTime
  7.       private
  8.         integer :: year    !< @private The year
  9.         integer :: month   !< @private The month (as integer).
  10.         ...
  11.     contains
  12.       private
  13.         procedure, pass(this),public :: SetTime       !<          @copydoc timeclass::settime
  14.         procedure, pass(this)        :: CalculateJDN  !< @private @copydoc timeclass::calculatejdn
  15.         procedure, pass(this)        :: SetJDN        !< @private @copydoc timeclass::setjdn
  16.         ...
  17.         procedure, pass(this)        :: copy          !< @private @copydoc timeclass::copy
  18.         ...
  19.         generic, public :: assignment(=) => copy      !<          @copydoc timeclass::copy
  20.         !> @{ @protected
  21.         final :: destructor !< @copydoc timeclass::destructor
  22.         !> @}
  23.     end type TTime
  24.  
  25.     ! This is the only way a constructor can be created,
  26.     ! as no "initial" exists, emulates the C++ constructor behavior
  27.     interface TTime
  28.         module procedure constructor
  29.     end interface TTime

To make sure doxygen generates a class-like documentation for our fortran class, it needs to be told it is a class. This can be done by documenting the class itself and using the keyword @class nameclass, with nameclass the name doxygen will use for this class (so you can choose something different from the actual class name). Unfortunately, doxygen will call this a “module” in the documentation (just poor luck in nomenclature). On the module page for the ttime class a listing is provided of all elements given in the class definition. The documentation added to each member (e.g.,:

  1. integer :: year !< @private The year

is shown as “\brief” documentation. By default all members of our function are considered as public. Adding the @private, @public, or @protected keyword instructs doxygen explicitly to consider these members as private, public or protected. (I used protected in the ttime code not as it should be used in fortran, but as a means of indicating the special status of the final subroutine (i.e. protected in a C++ way).)

However, there seems to be something strange going on. When following the links in the documentation, we do not end up with the documentation provided for the functions/subroutines in the body of our timeclass module. Doxygen seems to consider these two distinct things. The easiest way to link the correct information is by using the keyword @copydoc functionreference . The documentation is (according to doxygen) still for two distinctly different objects, however, this time they have the exact same documentation (unless you add more text on the member documentation line). In this context, it interesting to know there is also @copybrief and @copydetails which can be used to only copy the brief/details section.

In this example, the constructor interface is not documented, as this created confusion in the final  documentation since doxygen created a second ttime module/object linked to this interface. However, not documenting this specific instance of the constructor does not create such a large issue, as the module(the fortran module) function itself is documented already.

Conclusion

Documenting fortran classes can be done quite nicely with doxygen. It provides various modes of output: from a fully working website with in-site search engine to a hyperlinked pdf or RTF document. The flexibility and large number of options may be a bit daunting at first, but you can start simple, and work your way up.

As Fortran is supported as an extension, you will need to play around with the various options to find which combination gives the effect you intended. This is an aspect present in all automated code documentation generation tools, since object oriented Fortran is not that widely used. Nonetheless, doxygen provides a very powerful tool worth your time and effort.

PS:

Permanent link to this article: https://dannyvanpoucke.be/oop-fortran-tut6-en/

Tutorial OOP(IV) : Operator and Assignment Overloading

In the previous tutorial, we created a constructor and destructor for our TTimer class.  Next, we extend our class with overloaded operators. Depending on the type of object your class represents, you may want to define an addition/subtraction/multiplication/… operator. In addition, the assignment operator deserves some extra attention as you may want to have a clear control over this operation  (e.g.deep copy vs shallow copy). The full source of this tutorial and the previous, can be downloaded from my github-page.

Let us start with the latter: the assignment operator. As with all other operators, it is possible to overload the assignment operator in modern fortran.

1. Assignment (=) operator overloading

When dealing with objects and classes—or extended data-structures in general—, their properties often are (implicit) pointers to the actual data-structure. This brings an interesting source of possible bugs due to shallow copies being made while deep copies are expected (although the problem may be less pronounced in Fortran than it is in Python).

In a fortran object, the assignment of a pointer component (i.e., an explicit pointer variable, or a component which is an object itself) happens via a shallow copy (or pointer assignment). In contrast, for an allocatable component, the assignment operation performs by default a deep copy (i.e., space is allocated, and values are copied). Shallow copies are very useful with regard to quickly creating new handles to the same data-structure. However, if you want to make a true copy, which you can modify without changing the original, then a deep copy is what you want. By implementing assignment overloading for your own classes, you have more control over the actual copying process, and you can make sure you are creating deep copies if those are preferred.

The implementation of overloading for the assignment operator is not too complicated. It requires two lines in your class definition:

type, public :: TTimer
        private
        ...
    contains
        private
        procedure, pass(this) :: Copy                   !< Make a copy of a timer object
        generic, public       :: assignment(=) => Copy  !< This is how copy is used.
        ...
end type TTimer

First, you need to define a class method which performs a copy-operation—which in a fit or original though we decided to call “copy” ;-).  As you can see this function is private, so it will not be accessible to the user of your class via a call like :

call MyTimer%Copy()

Secondly, you link this class method via the “=>” to the assignment-operator.  It is a generic interface, which means the assignment operator could be linked to different functions, of which the relevant one will be determined and used during run-time. This generic is also public  (otherwise you would not be able to use it).

The implementation of the class method follows the standard rules of any class method and could look like

pure subroutine Copy(this,from)
        class(TTimer), intent(inout) :: this
        class(TTimer), intent(in) :: from

    this%firstProperty = from%firstProperty
    ...
    !make explicit copies of all properties and components
    ...

end subroutine Copy

The “this” object which we passed to our class method is the object on the left side of the assignment operator, while the “from” object is the one on the right side. Note that both objects are defined as “class” and not as “type”. Within the body of this method you are in charge of copying the data from the “from”-object to the “this”-object, giving you control over deep/shallow copying.

In practice the overloaded operator is used as:

type(TTimer):: TimerThis, TimerFrom

TimerFrom = TTimer() ! initialization of the timers
TimerThis = TTimer() ! (cf., previous tutorial on constructors and destructors)
... 
! do stuff with TimerFrom
...
TimerThis = TimerFrom ! although you type "=", the overloading causes this to be implemented as-if you wrote
                      ! call TimerThis%copy(TimerFrom)

2. Operator (+,-,*,/,…) overloading

Just as you can overload the assignment operator above, you can also overload all other fortran operators. However, be careful to keep things intuitive.  For example, an addition operation on our TTimer class is strange. What would it mean to add one timer to another? How would you subtract one chronometer from another? In contrast, inside our TTimer class we have a list of TTime objects which can be used to represent a date and time, as-well-as a time interval.[1]  For the remainder of this tutorial, we will assume the TTime class only represents time-intervals. For such a class, it makes sense to be able to add and subtract time intervals.

Let us start with the basic definition of our TTime-class:

type, public :: TTime
  private
   ...
   ! the properties of the TTime class
   ...
contains
  private
   ...
   ! the methods of the TTime class
   ... 
   procedure, pass(this)        :: copy          ! Copy content from other TTime instance,  
                                                 ! private, accessed via the assignment statement
   procedure, pass(this)        :: add           ! Add two TTime instances.
   procedure, pass(this)        :: subtract      ! subtract two TTime instances.
   generic, public :: assignment(=) => copy      ! This is how copy is used.
   generic, public :: operator(+)   => add       ! This is how add is used.
   generic, public :: operator(-)   => subtract  ! This is how subtract is used.
   final :: destructor
end type TTime

interface TTime
   module procedure constructor
end interface TTime

The TTime class has a constructor and destructor, implemented as we discussed before. The assignment operator is over-loaded as well. The overloading of the “+” and “” operator follows the same setup as for the assignment operator. First, you define a class method where you will implement the addition or subtraction. Second, you link this class method to the operator as a generic. The main difference with overloading the assignment operator is that you need to use the keyword operator instead of assignment, during the second step. The class methods are private, while the generic link is public. The only thing left to do is to implement the class methods. In case of operator overloading, the class methods are functions.

pure function add(this,that) Result(Total)
     class(TTime), intent(in) :: this, that
     Type(TTime) :: total

total = TTime()
...
! implementation of the addition of the properties of 
! this to the properties of that, and storing them in 
! Total
! e.g.: Total%seconds = this%seconds + that%seconds        
...
end function add

The returned object need to be defined as a type, and the further implementation of the function follows the standard fortran rules. It is important to note that for a function-header like this one, the object to the left of the operator will be the one calling the overloaded operator function, so:

Total = this + that

and not

Total = that + this

This may not seem this important, as we are adding two objects of the same class, but that is not necessarily always the case. Imagine that you want to overload the multiplication operator, such that you could multiply your time-interval with any possible real value. On paper

Δt * 3.5 = 3.5 * Δt

but for the compiler in the left product “this” would be a TTime object and “that” would be a real, while in the right product “this” is the real, and “that” is the TTime object. To deal with such a situation, you need to implement two class methods, which in practice only differ in their header:

pure function MultLeft(this,that) Result(Total) 
    class(TTime), intent(in) :: this
    real, intent(in) :: that 
    Type(TTime) :: total

and

pure function MultRight(that, this) Result(Total) 
    class(TTime), intent(in) :: this
    real, intent(in) :: that 
    Type(TTime) :: total

In the class definition both functions are linked to the operator as

procedure, pass(this) ::  MultLeft
procedure, pass(this) ::  MultRight
generic, public :: operator(*) => MultLeft, MultRight

With this in mind, we could also expand our implementation of the “+” and “” operator, by adding functionality that allows for the addition and subtraction of reals representing time-intervals. Also here, the left and right versions would need to be implemented.

As you can see, modern object oriented fortran provides you all the tools you need to create powerful classes capable of operator overloading using simple and straightforward implementations.

In our next Tutorial, we’ll look into data-hiding and private/public options in fortran classes.


[1] You could argue that this is not an ideal choice and that it would be better to keep these two concepts ( absolute and relative time) separate through the use of different classes. 

Permanent link to this article: https://dannyvanpoucke.be/oop-fortran-tut5-en/

Tutorial OOP(III): Constructors and Destructors

In this tutorial on Object Oriented Programming in Fortran 2003, we are going to discuss how to create constructors and destructors for a Fortran class. During this tutorial, I assume that you know how to create a new project and what a class looks like in Fortran 2003.  This tutorial is build around a TimerClass, which I wrote as an upgrade for my initial timing module in HIVE-tools. The full source of this TimerClass can be found and downloaded from github.

Where the former two tutorials were aimed at translating a scientific model into classes within the confines of the Fortran programming language, this tutorial is aimed at consolidating a class using good practices: The creation a constructor and destructor. As the destructor in Fortran classes is most straight forward of the two, we’ll start with it.

1. The destructor.

A destructor is a method (i.e., a class subroutine) which is automatically invoked when the object is destroyed (e.g., by going out of scope).  In case of a Fortran class, this task is performed by the class-method(s) indicated as  final procedure. Hence such methods are also sometimes referred to as finalizers. Although in some languages destructors and finalizers are two distinctly different features (finalizers are then often linked to garbage collecting), within the Fortran context I consider them the same.

Within the definition of our TTimerClass the destructor is implemented as:

  1. module TimerClass
  2. implicit none
  3.  
  4.     type, public :: TTimer
  5.       private
  6.       ! here come the properties
  7.     contains
  8.       private
  9.       ! here come the methods
  10.       final :: destructor
  11.     end type TTimer
  12.    
  13. contains
  14.  
  15.     subroutine destructor(this)
  16.     Type(TTimer) :: this
  17.     ! Do whatever needs doing in the destructor
  18.     end subroutine destructor
  19.    
  20. end module TimerClass

In contrast to a normal class-method, the destructor is called using the final keyword, instead of the usual procedure keyword. This method is private, as it is not intended to be used by the user anyway, only by the compiler upon cleanup of the instance of the class (i.e., the object). Furthermore, although defined as part of the class, a final subroutine is not type-bound, and can thus not be accessed through the type.

The destructor subroutine itself is a normal Fortran subroutine. There is, however, one small difference with a usual class-method, the parameter referring to the object (c.q. “this“) is indicated as a TYPE and not as a CLASS. This is because the destructor is only applicable to properties belonging to this “class” (Note that final subroutines are not inherited by the child-class). For a child-class (also called a derived class), the destructor of the child-class should deal with all the additional properties of the child-class, while the destructor of the parent-class is called to deal with its respective properties. In practice, the destructor of the child-class is called first, after which the destructor of the parent class is called (and recursively further along the class its family tree.)

So what do you put in such a destructor? Anything that needs to be done to allow the object to be gracefully terminated. Most obviously: deallocation of allocatable arrays, pointer components, closing file handles,…

2. The constructor.

Where other programming  languages may provide an initialization section or access to a key-worded constructor. Although Fortran allows for variables to be initialized upon definition, there is no constructor keyword available to be used in its classes. Of course, this does not prevent you from adding an “init()” subroutine which the user should call once the new object is allocated. You could even use a private Boolean property (initialized old style)  to keep track of the fact that an object was initialized when entering any of its methods, and if not, call the init() function there and then. There are many ways to deal with the initialization of a new object.  Furthermore, different approaches also put the burden of doing things right either with the programmer developing the class, or the user, applying the class and creating objects.

Here, I want to present an approach which allows you to present a clear set-up of your class and which resembles the instance creation approach also seen in other languages (and which implicitly shows the “pointer”-nature of objects ):

NewObject = TClass()

In case of our TTimer class this will look like:

Type(TTimer) :: MyTimer

MyTimer = TTimer()

This means we need to have a function with the exact same name as our class (cf., above), which is achieved through the use of an interface to a module procedure.  Just giving this name to the constructor function itself will cause your compiler to complain (“Name ttimer at (1)  is already defined as a generic interface“).  By using a different name for the  function, and wrapping it in an interface, this issue is avoided.

  1. module Timerclass
  2.     implicit none
  3.  
  4.  
  5.     type, public :: TTimer
  6.         private
  7.     ...
  8.     contains
  9.         private
  10.         ...
  11.     end type TTimer
  12.    
  13.     interface TTimer
  14.         module procedure Constructor
  15.     end interface TTimer
  16.  
  17. contains
  18. function Constructor() Result(Timer)
  19.     type(TTimer) :: Timer
  20.    
  21.     !initialize variables directly
  22.     Timer%x=...
  23.     ! or through method calls
  24.     call Timer%setTime(now)
  25.     ...
  26.  
  27. end function Constructor
  28.  
  29. end module TimerClass

Note that the constructor function is not part of the class definition, and as such the object is not passed to the constructor function. In addition, the Timer object being created is defined as a Type(TTimer) not Class(TTimer), also because this function is not part of the class definition.

That is all there is to it. Simple and elegant.

In our next Tutorial, we’ll have a look at operator and assignment overloading. Combined with a constructor and destructor as presented here, you are able to create powerful and intuitive classes (even in Fortran).

Permanent link to this article: https://dannyvanpoucke.be/oop-fortran-tut4-en/

New year’s resolution

A new year, a new beginning.

For most people this is a time of making promises, starting new habits or stopping old ones. In general, I forgo making such promises, as I know they turn out idle in a mere few weeks without external stimulus or any real driving force.

In spite of this, I do have a new years resolution for this year: I am going to study machine learning and use it for any suitable application I can get my hands on (which will mainly be materials science, but one never knows).  I already have a few projects in mind, which should help me stay focused and on track. With some luck, you will be reading about them here on this blog. With some more luck, they may even end up being part of an actual scientific publication.

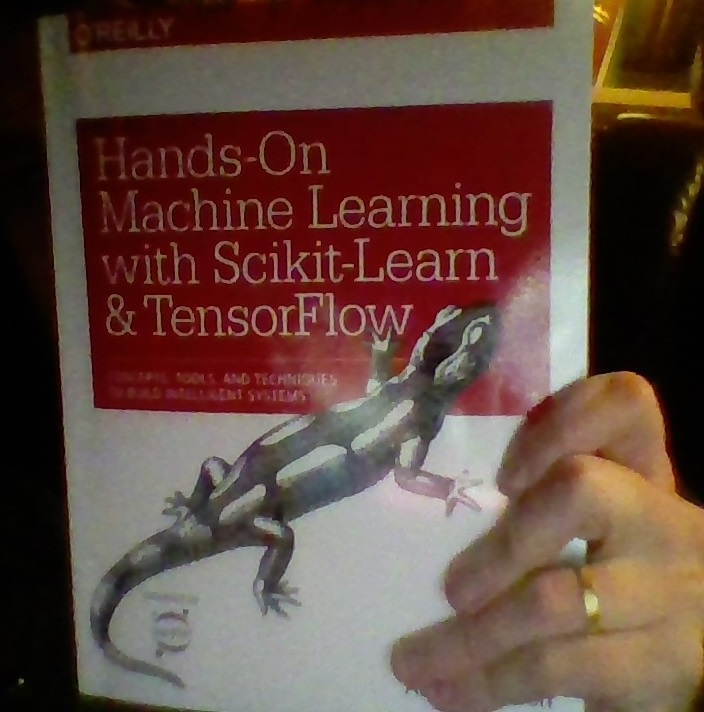
But first things first, learn the basics (beyond hear-say messages of how excellent and world improving AI is/will be). What are the different types of machine learning available, is it all black box or do you actually have some control over things. Is it a kind of magic? What’s up with all these frameworks (isn’t there anyone left who can program?), and why the devil seem they all to be written in a script langue (python) instead of a proper programming language? A lot of questions I hope to see answered. A lot of things to learn. Lets start by building some foundations…the old fashioned way: By studying using a book, with real paper pages!

Happy New Year, and best wishes to you all!

Permanent link to this article: https://dannyvanpoucke.be/new-years-resolution-en/